A detailed study of history reveals that henna was used in the Arab world for more than five thousand years. Woman not only used henna to decorate their hands and feet with intricate designs, they used it to ward off evil, bring good luck and prosperity to their homes.
There is a controversy regarding the origin of henna or mehendi as dyeing agent. Botanist believes that henna plant or Lawsonia Inermis originated in Egypt and was used in the mummification of pharaohs. Henna was used to dye the hair and nails of the dead pharaohs and was believed that this would bring them good fortune in their next life. Evidence shows that henna was passed on to India by Egypt as early as 700 A.D. and it was used to decorate hands and feet. Henna was also used for medicinal purposes and to dye hair, cloth, leather and manes of horses and furs of other animals.
Did you know that henna was used as a hair dye for almost 6,000 years? The daughters of pharaohs used henna to dye their hair red. It is said that opera singer Adelina Patti popularized the use of henna as a hair dye in Europe in 1800s.You can also apply the time-tested henna paste on your hair instead of the hair colours that have ammonia in it. Separate your hair strands and apply the paste with a brush while standing in front of the mirror. Make sure you don’t miss a single strand of hair. This will give you the desired colour and at the same time leave your hair velvety soft.
The Muslim tradition and religion makes the use of henna compulsory. The Sunnah (tradition of Prophet Mohammad) and Hadith (narration of the prophet) allows both men and women to use henna. Men use it to dye their hair and beards red. Women use henna to paint their finger nails and toe nails red. Henna in Muslim culture depicts feminity. Mehendi is done during joyous celebration like Eid, when the family gathers for a feast. The use of henna is prohibited during mourning in Islamic religious literature. In fact, the whole idea of mehendi originated in Muslim dominated Arabian countries and was gradually passed on to other cultures. The arrival of Islam in India popularized the henna culture among other communities and it also revived the use of henna that was popular in the Vedic ages with a new gusto!
Here are Some Beautiful Indian Mehandi Designs that You Can Create at Home:
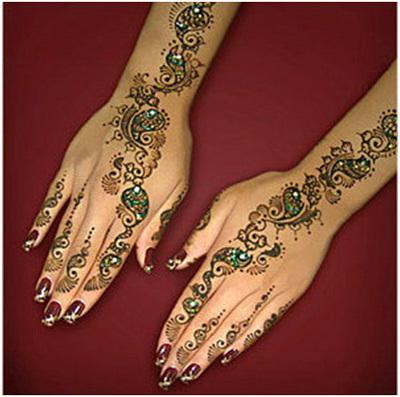
1. Here is a beautiful Indian
mehendi design with intricate details and floral motifs; this design is a combination of peacock and floral motifs, the fingers have heavy details while there is some gap left on the palm which is filled with tiny flowers. The patterns and motifs make the design unorthodox and completely different. Nevertheless this mehendi design is very unique andcontemporaryand looks lovely on the hands.
2. Now from a modern design, we move on to traditional Indian
Bridal mehendi designs for hands. This design is apt for the bride to be and it can also be worn by close family members of the bride on the joyous occasion. This design has intricate traditional motifs like peacock, lace, bangles and flowers that cover the full arms of the bride making her look glamorous. It is best to usedark mehendi to make the design more bold and prominent.
3. Who said mehendi is just for the hands?Feet are also a great canvas for this natural art, and this design is a perfect example. It is very apt for auspicious occasions like weddings and engagement. The design is very beautiful for its delicate details that cover both the ankles and feet. The design embraces the ankles like an anklet or a ‘payel’. The lace and floral motifs make the design look so beautiful.
4. This is very traditional mehendi design and at the same time it is unique unlike traditional Indian mehendi design that covers the tips. In this pattern the tips are left without any design. The motifs are also different on both hands making the design very unique. This intricate Indian
mehendi design fills up the hands, thus making it ideal for a bride to be.
5. This design is very traditional and fills up the hands, without making it look messy. The slight gaps left in the design makes it looksimple and appealing. This mehendi design is apt for anyone. Even a bride’s mother also can opt for this design easily.
6. This Indian mehendi design is totally different from the traditional mehendi designs, and is a fun option to try if you are bored of traditional motifs. It contains intricate designs and various shapes; you can easily create this funky design at home. The hands also don’t look messy with this design, young college goers will simply like to flaunt it.
7. For those who want minimal mehendi designs on their hands, this is a great option. The floral motifs at the center are drawn diagonally with designs on the individual fingers. The colorful stones are added to glam up the look.
8. Are you bored of same old mehendi designs? If yes, then add some uniqueness to your mehendi with the use of different coloured stones. These stones are available in different sizes and shapes, and will make the designs look more colorful and vibrant. The big stones are placed in the middle of the circular designs and other tiny stones are placed all over the design to make it look bright and trendy. Use different shapes and colours to get the desired effect. Make sure the adhesive you use to stick these stones are skin friendly yet long lasting.
9. For those who love mehendi on their feet, here’s an intricate Indian mehendi design you can try on your feet. The design covers a good amount of space on your feet, thus making it ideal for brides to be. You can also do this design for your sister or a close friend’s wedding.Make sure to wear a good shade of nail paint too.
10. If you love Indian mehndi designs full hands with intricate designs and details, then this one is well suited to your taste. The designs are very beautiful and it will fill up your entire hands. However, unlike traditional mehendi designs, the top of the fingers are left open for that unique touch.This is a great choice for the modern bride who loves a great mix of traditional and contemporary mehendi designs.
11. This is one of those simple Indian Mehendi designs for hands which would suit a bride quite well. The designs and the choice of red mehendi make the designs pop out very wellon the fair hands of the bride, while the floral motifs and other designs on the fingers make it lookmodern.
12. This mehendi design for the feet looks very apt for a bride, since there are a lot of details and intricate designs. The whole feet are decorated with detailed motifs to make this mehendi design look really beautiful. It is the front chequered patterns with tiny flowers in the middle that instantly grabs the attention! It also makes this design look very unique.
13. Mehendi designs can be extremely elaborate on the top of the hands too. Here is an example of it. This one has unique styles, with each finger showing different patterns.It covers the back of the hands and reaches up little above the wrist. The design on the wrist looks like a bangle with beautiful paisley and floral motifs.
14. Another design with colorful beads can be seen here. This one is apt for a modern bride or for anyone attending a social function. The stones and modern motifs make this simple Indian mehndi designs for hands very attractive and fun. It is the accessories that enhance this look.
15. If you want to create some mehendi designs on the feet, then try this one on the occasion of a wedding. It is a beautiful design and has a nice mixture of traditional and modern patterns.
16. A very
simple mehendi design, this looks great on anyone and can be done for any type of occasion like weddings and festivals. There is also use of darker mehendi in this pattern to make the motifs more prominent and beautiful.
17. For those looking for medium patterns and unique style, this one is apt. It includes the use of two types of mehendi like red and black mehendi. The black mehendi is used to do the borders while the red one is used to fill in. Designs like oval and heart shapes are done on the fingers to add a touch of uniqueness to this design. The use of beads in different colors is also included to add bling.
18. This design is unique for its distinct patterns and the dominant pattern of paisley is repeated on all sides. The big circular pattern in the middle makes the design really different. This design will make everyone go ‘Wow’ for its uniqueness.
19. This mehendi design has medium intricate motifs and all of these motifs are filled with glitters using glitter tubes. Different colours are used like red and blue. Colorful stones are used here to make the design more attractive to the youngsters.
20. This is a very simple looking yet intricately done design. The circular designs in the middle of the palm have microscopic details and are done finely. The patterns are delicately done in such a way that it doesn’t look messy.The tips of the fingers are darkened and the use of tiny flower motifs makes it different and attractive. Using a dark henna paste for this mehndi design makes it look really prominent on your fair hands.
 1. An outstanding Black Mehndi design, this fills the entire hand and even the finger tips are filled in, making for a great choice for brides on their special day. A mixture of intricately done gorgeous patterns, the use of black mehandi helps in creating the beautiful prominent designs, lending a unique look
 2. This Arabic Mehndi design makes predominant use of Black mehendi to create an appealing and traditional yet modern design. Using thick lines, prominent borders and shading, the floral motifs are brought to life. This black mehndi design will glam up and complement your festive attire through its sheer beauty.
 3. A perfect pick for any black mehandi lover, this design covers around three-quarters of your hands, leaving the finger tips untouched for that balanced yet gorgeous look. The design is enhanced with the use of red beads and the predominantly floral, weave and traditional motifs bring out its true beauty.
 5. A clutter-free beautiful black mehndi design for the feet, this looks really chic and trendy.
 6. If you are a bride-to-be and looking for an exquisite black mehndi design, how about this pattern that we love? The patterns are not messy but very gracefully done and the finger tips have been left open in this unique style which borrows heavily from Arabic mehndi designs. We think this mehandi design is just awesome!
 7. This gorgeous black Indian mehandi designs combining floral motifs and delicate weave patterns can be used to fill up the back of the palm. Classy and elegant yet so attractive, this unique design will surely draw attention!
 8. Here’s another glamorous black mehndi design that will easily add to the beauty of the bride’s hands on her special day. The alternating filled and empty rhombus patterns with intricately done minute and varied patterns looks extremely alluring and attractive.
 10. This extravagant mehandi design is perfect for wear on festivals and grand occasions. The entire style is endowed with a modern touch and the use of black mehndi makes the floral designs stand out prominently, thus looking gorgeous on the hands of anyone who wears this.


 2. Spray


